Category Archives: Uncategorized

“What’s up with that?” May 7th event.

All too frequently homes have ridiculously poor workmanship, but homeowners never see it, until they have an audit.
Looking around homes I often see this shoddy work and ask “What is up with that?”, which is then usually repeated by the homeowners when I show it to them.
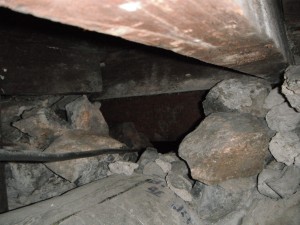
Hole large enough to fit through.

Frequently we joke about holes large enough to fit through – this one actually is. Okay, maybe it’s big enough for your kid to fit through but it is huge nonetheless.

On May 7, 2011, from 9 am until about 1 pm, we’ll be doing a lot of work we don’t typically do, and leaving to the side much that we would normally focus on, because this “Philadelphia style” two-family home is chock full of “what’s up with that” situations.

We’ll be sealing that hole, many other holes in the basement, sealing a lot of floor registers that are sending cold basement air, in addition to heated air, through cracks (see right), a bit of ‘stuff/roll/foam’ work in the attic and more.
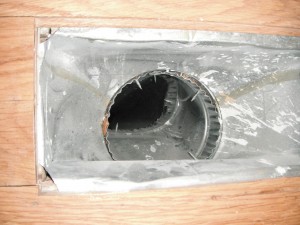
If you can join us, and we hope you can, please let us know by sending an RSVP email to ArlHEET@gmail.com

Using a caulk gun is simple, right?

Yes, it is, but I am amazed at how frequently I see people do it wrong. A few simple things can make the difference between nobody noticing the caulk is there and an expensive mess.

Without further ado, here are some of the most common mistakes made when caulking:

  1. What a mess. Typical of spout cutters.

    Never use the spout cutter on your caulking gun. Ever seen someone do this? Usually they put the tip of the tube in the hole, squeeze to cut, and then end up wrenching the tube back and forth hoping to actually cut the tip. It inevitably looks like somebody chewed on the tip of the tube and results in an ugly, uneven bead of caulk that requires a lot of time and effort to correct.

  2. Don't let this happen to you.

    Using a utility knife, cut the tip of the tube at a 45 degree angle. You are not trying to mimic the end of a tube of toothpaste with a flat tip. Toothpaste does a good job of laying a cylinder of paste on your brush – you do not want a cylinder of caulk on your window trim. You want a bead that melds into the frame (floor, baseboard, what-have-you) almost invisibly. (Generally, in fact, you are aiming for invisibility of the caulk.)

  3. 45 degree angle on tip of tube. edit Delete caption

    Cut only a SMALL amount of the tip off, about 1/8″ for most applications. I regularly see people cut off significant portions of the tip ‘o the tube – that results in a very large bead of caulk coming out making, in most cases, a big mess.

  4. “Slow and steady wins the race.” You don’t want to emulate the turtle, but you don’t need to pretend you’re a rabbit in a muscle car either. Move slowly, see how the bead is coming out as you move and adjust accordingly.
  5. Squeeze the handle gently. More is not better in most cases. Caulking is not a muscle intensive activity nor is it a way to show off strength. You can always add more caulk easily, but removing the mess left after you’ve used an entire tube of caulk on one window is not easy.
  6. Use your finger to smooth the bead of caulk, again at a 45 degree angle. You don’t need to jam your finger into that crevice – you just need to make the caulk there smooth. This is especially important when using fire-block caulk in applications around chimneys, caulking top plates, etc. so the caulk gets into those gaps, not for aesthetics. Some people prefer to use a damp sponge, wrap rags over their fingers, etc. That doesn’t work for me, but I’ve seen others do it well.

All too frequently I see people put way too much caulk down, usually quickly and with a heavy hand, and then spend five minutes trying to remove the excess caulk because they haven’t followed the above rules.

That’s not a good use of your time or resources. Go slowly laying as little as is needed. When you run your finger over that bead afterward you’ll have far less on your hand and more caulk left in the tube for the next application.

Light bulb cheat sheet

As a follow up to the earlier post about CFLs and LEDs (“Those bulbs are ugly”), it is worth pointing out this great short piece by Consumer Reports on which bulbs go where, depending on their color temperature (degrees kelvin.)

To simplify even further, here’s a quick cheat sheet with the degrees Kelvin you should look for on the bulb packaging:

  • Bathroom vanity, dining room, where you sit staring at your significant other: 2700K
  • Kitchen, workshop, crafts room (detail oriented work): 3500 K to 4100 K
  • Reading room: 5000 K to 6500 K

Or, as I mentioned in that earlier post, try to find the Kelvin of the bulb you’re replacing, if you like it.

Those bulbs are ugly

I happened to be at a big box hardware store, that shall not be named, talking to the lighting guy. We were speaking about LEDs and he said something about how they look bad.
When I asked why, he responded “They’ve got all these little dots putting out light, have you seen them?”
I fell silent for a moment, this was a new argument for me. I then asked “How often do you stare at the light bulbs in your home?” He didn’t have an answer to that.
Since I’m not a lighting expert or engineer, there’s an excellent chance any definition I try to provide about lumens, Kelvin or spectrum would be torn apart. I encourage those of you looking to enlighten about the definitions to do so in the comments.
People come up with all kinds of crazy reasons not to install CFLs or LEDs. Usually the reasons are based on price (though they won’t say it), false information, absolutely nothing or a combination of the three. (There are some places not to put CFLs, and I’ve talked about some places not to use them.)
While the “dot theory” was new to me, plenty of people complain that the light quality isn’t good, they’re too dim, or that they’re too expensive. These arguments are based in little to no fact, but let’s give each of them a very few moments discussion.
Light quality: Frequently people opposed to CFLs or LEDs say these lights aren’t good for their artwork, or for reading, or that they provide only a cold, dim light.
What they’re typically missing is an understanding of lumens, kelvin (light temperature) and spectrum (light color.) CFLs and LEDs, just like incandescents, can be purchased in a variety of flavors and styles, including warm, cool, daylight and bright. To say that CFLs or LEDs are “too cold” or “too dim” means that you either don’t know what you’re talking about or you refused to purchase bulbs that had the same lumens/kelvin/spectrum as the ones there previously.
Too dim: We could go into a great lengthy and technological discussion about lumens, which measures the light intensity of a bulb. Or, you can look at the package that the bulb comes in which typically says something like “Equivalent to a XX watt bulb” where “XX” is the number of watts.
Still not satisfied? Look at the package of the incandescent bulb (or look it up online.) How many lumens does it provide? Now look for a CFL or LED that provides the same amount of lumens. That was easy, wasn’t it?
Too expensive: There is, of course, something to this. The initial cost of a CFL or LED bulb is higher than an incandescent. This is, I think, the crux of most people’s arguments. Light quality and other issues are a charade because these people aren’t going to the store to buy high quality incandescents – they go to the supermarket or hardware store and buy the least expensive bulb they can. They’re not concerned about a warm glow around Johnny’s third-grade painting, they’re concerned about the bottom line.
Well then, here’s the bottom line: A CFL will save you between $30-$100 per bulb over it’s 7-10 year lifespan. LEDs will save you more than $100, some almost $300, over it’s 17-30 year lifespan. Your incandescent? It’s going to keep sucking energy and money until it dies in a year. CFLs and LEDs pay for themselves long before they die, and then keep on saving.
They’re too something-or-otherish: My brother and I recently had a discussion about how much he’d save if he installed some air-tight LED lights for some recessed lighting in his home. His immediate response was that the light was no good for reading. Knowing my brother and the location of the lights I asked “how often do you actually read in that room?” His answer, never. (He has since installed one as a test and liked it. He’s now waiting for me to buy the rest for him.)
My point is this, people come up with all sorts of reasons to oppose new bulbs for a variety of reasons that make absolutely no sense whatsoever. They fail to recognize that these bulbs will save them money, and help the planet, while providing equal or better light quality.
So the next time someone says they don’t like either CFL or LED bulbs, ask them why. Then try to politely explain that they can get the same quality light with a more efficient bulb.

20 People, 4 Hours, 21% Reduction in air-infiltration

Thank you for another great project Saturday.
20+ people swarmed over the home and did an amazing job while having a great time. Some people seemed to find their calling sealing the hole around the chimney in the attic, others set windows tight, and others seemed to discover a new hobby in using mortar. It was an amazing crew. Thank you.
Before I get to the good news about how much air infiltration you stopped, I should point out that due to ongoing renovation in the home AT LEAST ¼ of the holes in the home could not be sealed.
That out of the way, we went from 3345 cfm air flow down to 2645 cfm (after calculating for temperature) – a 21% drop! That translates to at least $123 in fuel savings/year*, $1230 over the next ten years, and will allow them to feel far more comfortable – no more drafty windows while sitting on the couch, cold air coming through the attic door, etc.
To that point the homeowners told me today “It was a great experience and we loved meeting the group. We woke up to a MUCH less drafty house this morning!”
It also means a reduction of 783 lbs. of CO2 per year.
Thank you all again for making yesterday such a success!
An aside: If you ever have suggestions what we should do differently, things we aren’t doing but should, things we shouldn’t do but are, or anything else we hope you’ll let us know – we’re always trying to improve the experience for all.
* – For the math inclined, each 100 cfm drop equals approximately 7 therms of saved fuel.
700 cfm/100=7. Therefore 7 x7=49 therms saved.
One gallon of oil equals 1.38 therms.49 therms/1.38 = 35.5 gallons of oil saved.
35.5 X $3.486 (avg. cost of oil in our area) = $123

Union of Concerned Scientists write-up on A-HEET

If you are a member of the Union of Concerned Scientists you may have received your most recent Earthwise newsletter in the last few days.

Front page, to the right, you’ll see a nice piece about a recent A-HEET event. You can find the article online here.

After you read it remember to sign up for this Saturday’s event! Saturday, Feb. 26, 9 am until 1 pm in Arlington Heights. RSVP by emailing ArlHEET@gmail.com

Next Event: Saturday, Feb. 26

We’ll be holding our next event on Saturday, Feb. 26th, from 9 am until 1 pm.

If the last two events were “smaller,” then this is going to be much bigger. It isn’t that the house is large, but there is a tremendous amount of work to be done.

Teams at this event will include:

  1. Interior/Electrical – Installing child-safe “slider” outlets, a “smart” strip for the media center, taping off a chimney, caulking where the floor meets the baseboard and more.
  2. Windows – Almost every window needs work. If you want to learn how to stop your windows from leaking this is a great chance to get lots of experience.
  3. Garage – Within the home, this garage is chock full of leaks and presents not only unusual issues, but code issues we’ll be meeting (and exceeding) as well.
  4. Basement – Lots of holes to the exterior, lots of holes to the first floor, and several safety issues we’ll be fixing.
  5. Attic – A little bit of demo work, a little bit of expanding foam, and a little bit of rigid foam will go a long way to make this house warmer.
  6. Door weatherstripping – Three doors need to be completed. If your door is leaky, we’ve got the materials you should be using. Learn how it’s done properly.

That’s a lot of work folks, and we’re hoping to get a lot of people there to make it all happen. If you can make it, please RSVP, and thanks!

Tired of paying someone to get rid of ice dams each year?

A lot of people are getting ice dams this year… a lot of people get ice dams every year.Why? In most cases it is due to a lack of insulation, air-sealing, or both. (Spoiler: If you want to read the best, and most detailed, piece on this I’ve seen, read Martin Holladay’s article on Green Building Advisor.)

If you call a roofer they will usually tell you to install “ice shield” under the shingles as a solution. As you’ll see, that’s kind of like telling you to take medication because you keep getting food poisoning at your favorite restaurant. Better, of course, is to stop eating there.

Continue reading

CFLs: When and where NOT to use them

I’m going to annoy a lot of good people with this post.
I’m a big fan of CFLs in most places throughout the home. The energy savings they offer is tremendous, and they pay for themselves in very short order.
A few years ago purchasing CFLs was hit or miss. Some would start right up and give a good bright light, some would not. The “special” bulbs such as bathroom globes, dimmable spots, and others could be hard to find and expensive to purchase. Today, while there are still occasional crummy bulbs to be found, most will give you a good bright light and last a long time. You can find, with relative ease, candelabras, spots, exterior-rated, dimmable, globes and many more.
Here’s the part where I annoy a lot of good people: Not every bulb in your home should be a CFL.
CFLs contain a small amount of mercury (something less than 1/100th that of a  thermometer.) They’re perfectly fine while intact but if they break, 4 micrograms or so of mercury can be released. That’s not much, and most people (including me) don’t get particularly concerned about it, but why not avoid the problem in locations most prone to risk of breaking?
I’ve never knocked over a table or floor lamp, but I know it happens. Especially in homes with children, I encourage people to keep CFLs out of these types of fixtures. Other places in the home, like clip-on lamps, low-hanging basement lights (usually just a bulb in a socket with no protection) can become an issue as well.
Fixtures throughout the rest of the home, including bathroom lights, recessed lights, enclosed hanging fixtures, etc. are perfect for CFLs. Also, LEDs are coming down in price and contain no mercury at all.
If you do break a bulb, here are the EPA’s official instructions on how to clean it up: http://www.epa.gov/cfl/cflcleanup-detailed.html
Finally, I was recently made aware of an email making the rounds about CFLs catching fire. Given the way CFLs work (very different than incandescent bulbs) and their significantly lower heat, it made no sense so I investigated. I quickly came upon this article at Snopes.com which put the issue to bed – there is no fire hazard and the email is erroneous.
UPDATE: One of the great things about this blog and the Arlington community is the wealth of knowledge. Two things have been pointed out to me that merit mention.
1. Only CFL bulbs specifically labeled as “dimmable” should be placed in fixtures that use dimmer switches.
2. Buy only CFL bulbs labeled as “Energy Star.” Why? Aside from energy consumption issues, in order to gain the Energy Star label the bulb must meet certain safety requirements. Non Energy Star bulbs do not have certain insulative properties that prevent overheating and fires.
3. CFLs have a hard time, and potentially create a safety hazard, in enclosed fixtures such as ceiling fixtures. CFLs put out very little heat and don’t like heat. In an enclosed fixture they can overheat and burn out faster than their expected life span.